
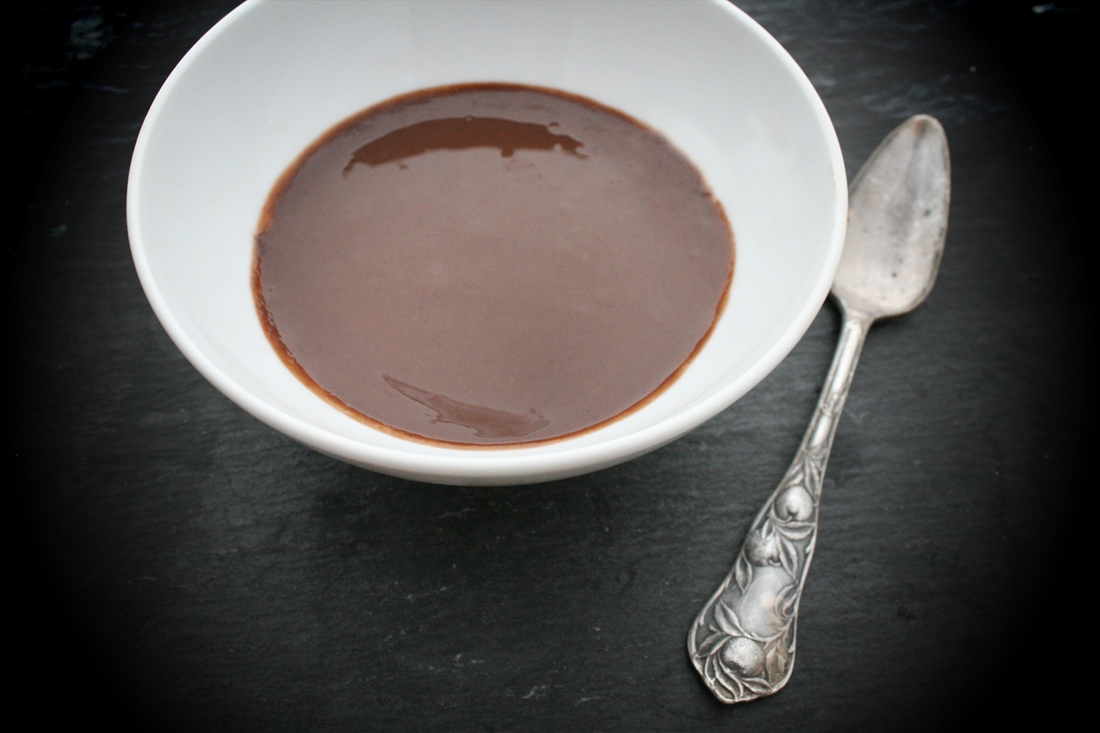
 Yesterday I shared my Sun-tella spread recipe. If you cannot have seeds, I have an alternate recipe for you! It doesn't have the same creamy mouth feel as the sunflower seed butter blend, but it is a nice spreadable chocolate. I like using coconut cream because it adds a rich deep flavor and texture - more than simply mixing oil and chocolate could have. And it is a nice additional source of fiber! Coconut Chocolate SpreadPrint | {wholly rooted}A spreadable chocolate which is tasty on toast, with graham crackers, or apple slices. GF/NF/DF {ingredients}
Melt your chips and coconut cream in a double boiler. Add the maple syrup, sea salt and vanilla bean, and stir. Turn off the heat and stir in your oil. It will thicken as it cools, but will still be spreadable. Spoon into a jelly jar and store at room temperature. This is good spread on toast, as a dip for apples - or try a spoonful of it in your coffee or hot cocoa. We had some on warm GF tortillas and I can't stop putting it in my coffee. So good!
1 Comment
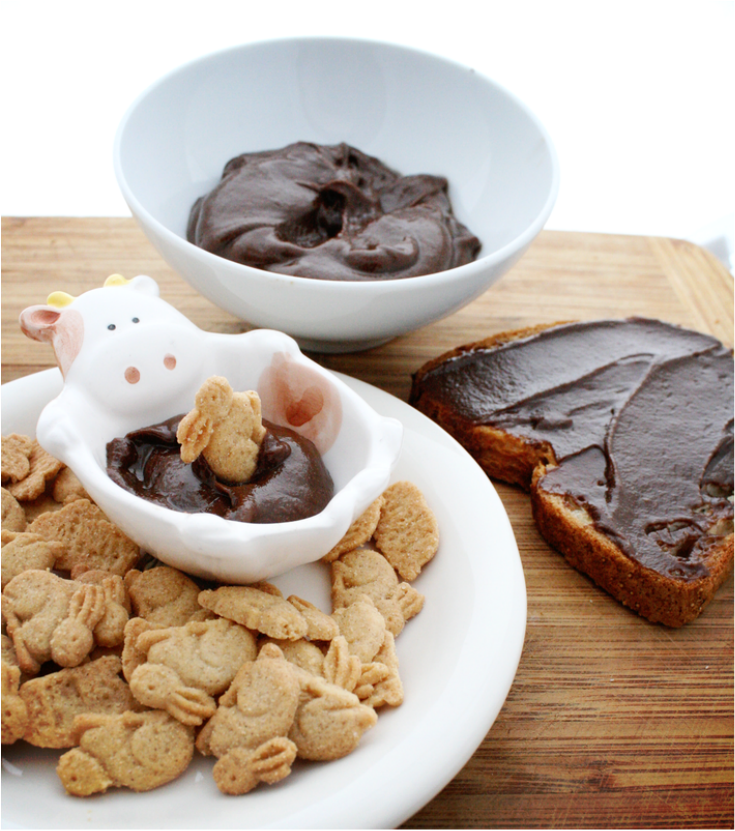 Food allergies didn't really sneak up on us in this house. It is something I always expected with my oldest. I have a lot of allergies (as did my mother growing up) and starting at a young age he refused specific foods (they made his mouth feel "spicy"). We noticed hives/stomach issues immediately after certain foods. So we adapted. We did food elimination diets, rotations - you name it. What we hadn't quite realized along the way was how sensitive he is to even the smallest, most minute, amount; and how potentially life threatening any exposure or reaction can be. We never knew when it would be hives/vomiting or if it will be full anaphylaxis. About a year ago we realized even with how "careful" we thought we were being with what we knew he reacted to, he was getting sick even without the offending foods in his diet, elimination diets were not enough, and it was time to get more answers. Through testing, we confirmed peanut and tree nut among a long list of other allergies. I know now that many kids are super sensitive to even the tiniest of exposure such as made in the same factory on the same line. So we changed EVERYTHING about how he eats and how WE eat. We make our own foods from scratch most of the time anyway, but even with that, we found if basic pantry supplies (flours, grains, oils, juices, etc.) were made on shared equipment or in the same facility, he would have a reaction. We discovered that even if the rest of us ate his allergen that was carefully prepared and cleaned our hands and mouths immediately after, he would often still have reactions. So no more nuts, nut butters of any kind, or products containing nuts come into our home. We are careful about every ingredient we use. Now, he rarely gets sick or has reactions anymore (knock on wood), and we feel our diligence is paying off. My husband lived in Germany a few times during his childhood, and he talks longingly about having the classic chocolate-hazelnut spread on toast for breakfast and/or Kaffeeklatsch often. Not only is the modern day version of these spreads filled with mostly sugar and emulsifiers these days, but it also has dairy and nuts. Two of the top allergens in our household. So I have been working on making a nut free/dairy free version of chocolate spread that he can eat on his toast. Since my son is allergic to so many protein foods (red meats, dairy, nuts, gluten) using healthy seeds is a nice addition to our diet. Sunflower seeds have a lot of vitamins such as Vitamin E, B1, manganese, iron, selenium, calcium, folate, B6, B3, and of course protein and good fats. This recipe starts with sunbutter. You can make your own by whizzing fresh sunflower seeds in a Vitamix until it is creamy. I use sunbutter because this brand is produced in a peanut/tree nut free facility, which can be hard to verify with bulk seeds. Their employees are not even allowed to bring any peanut products in their lunches. Same thing goes with the rest of the ingredients - I use them because I have checked and he has been good with them before. This recipe is pretty simple - sunflower seed butter, coconut cream/manna, cold press grapeseed oil, chocolate chips, maple syrup, vanilla bean, and sea salt. If you have allergies, be sure to check the manufacturing processes used for your ingredients. I have links to what I have used, but remember that production processes can change and what I may have verified recently (yet again) is for our specific allergies, and also may change if you are reading this in a year or in another country. Always remember to double check!  Sun-tella SpreadPrint | {wholly rooted}Delicious spreadable sunflower seed chocolate spread. Great on toast, with graham crackers, as a dip for apples, or by the spoonful. {GF/NF/DF} {ingredients}
Melt your chips and coconut cream in a double boiler. Add your vanilla bean and maple syrup. Stir well. Pour into a blender or mixer. Add your sunflower seed butter, grapeseed oil, coconut milk, and sea salt. Whiz quickly to incorporate. Don't over blend or you will get sludge. Spoon into a jelly jar and store at room temperature. Will thicken slightly as the it cools. 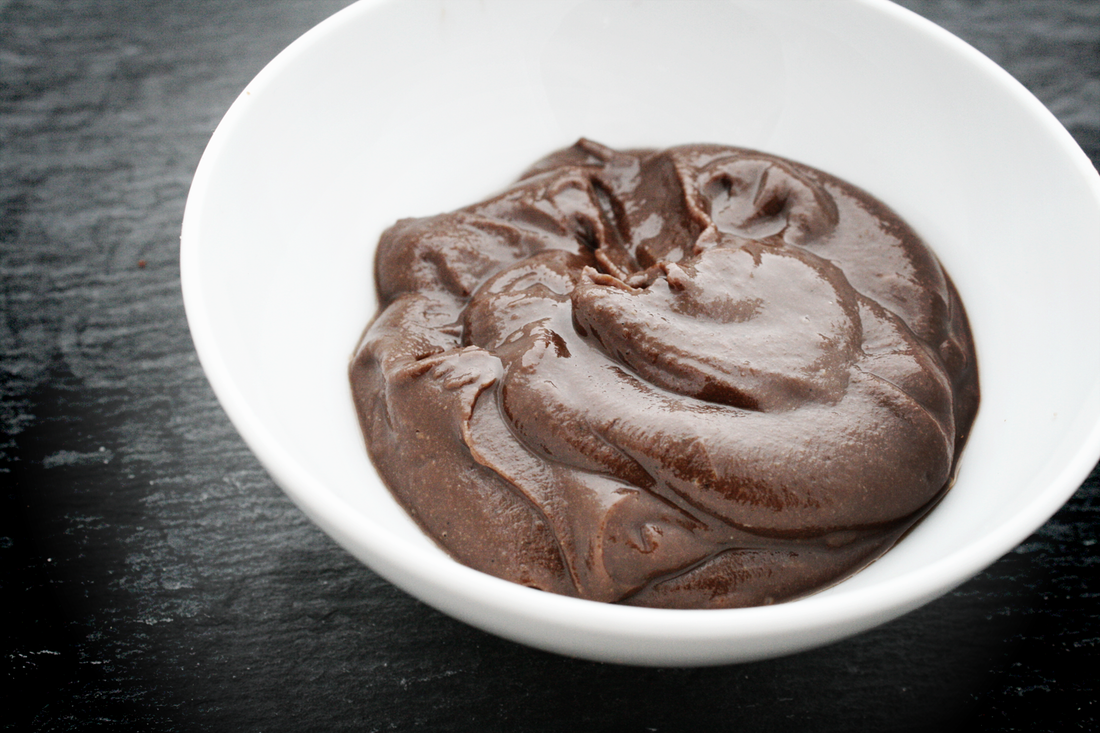 This passed the husband taste test. He has been happily eating it for breakfast and kaffeeklatsch all week. My allergy boy loved it on GF tortillas. Yum! {Tomorrow I will share my seed free coconut chocolate spread!} And another reminder to check your ingredients. I like using ingredients that I know are consistently tested and are aware of allergies. If they are specifically made for those with allergies, they are less likely to make mistakes and have more strict controls and processes in place. Oils, chocolates, and seeds can be challenging to verify as produced in a nut free facility. They are often processed with other bulk items or made in factories that make nut oils or granola bars or candies with who knows what other allergens. And "may contain" notices can be confusing. Most companies are happy to tell you if they are allergy safe and many publish allergy statements, ingredients, and labels online. So read labels, check, double check, and call or write the company if you are not sure!
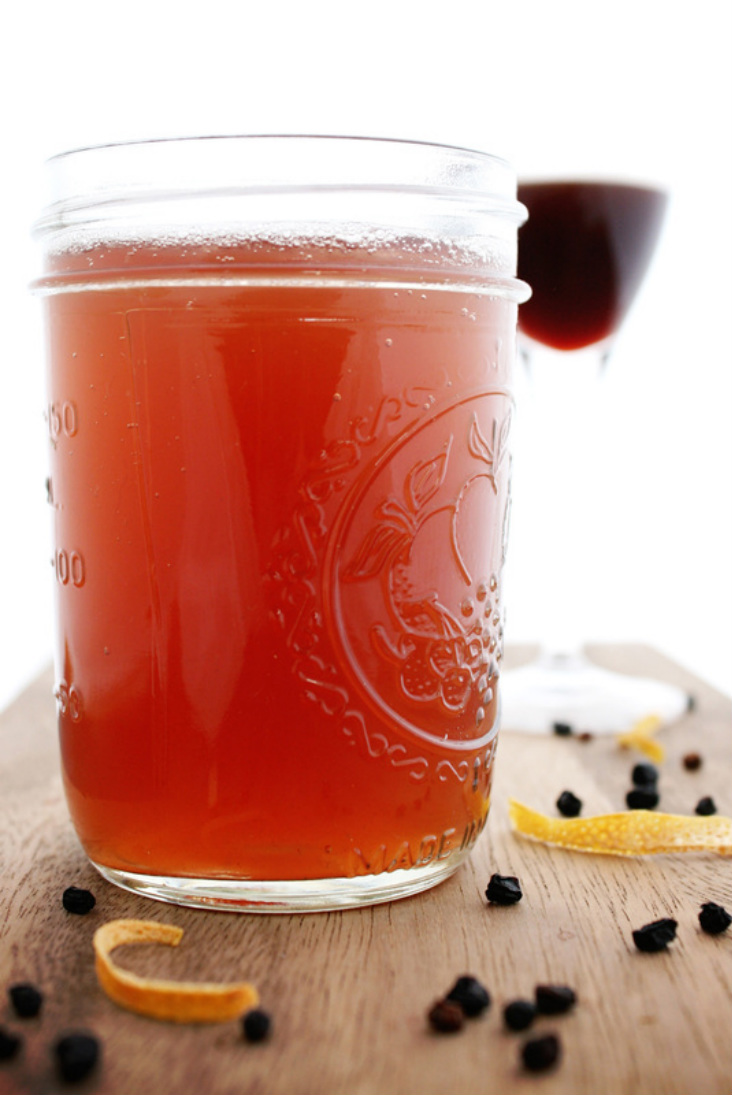 Sipping vinegars have been making a comeback within local artisan food communities. Sipping vinegars, also known as shrubs or in some variations as a switchel, have been around for a long time. During Colonial times, vinegar was used to preserve fruit for the off season and the resulting beverage was called a shrub. Switchel was another drink from that era, made from ginger, honey, vinegar, molasses, and water - also called haymaker's punch - and was often taken to the fields by farmworkers. A switchel was used like gatorade or sports drinks today - to refresh, cool, and replenish. I like them because the flavor options are endless, and they are a nice way to combine the medicinal or immune system boosting power of herbs with fizzy delicious better-than-a-can-of-soda-could-ever-be flavors. In this house we have some intolerance to corn syrup and manufactured citric acid so we don't do canned sodas. BUT we sometimes still love fizzy drinks. Water kefir, honey sweetened fruit syrups, and shrubs are our favorite homemade concoctions. This blend contains a rich combination of flavors. Elderberry, holy basil, astragalus, rose hips, ginger, citrus peel, and hibiscus. I like this in spring when we need a little immune system boost and support after a long winter and with the start of spring cold & allergy season. 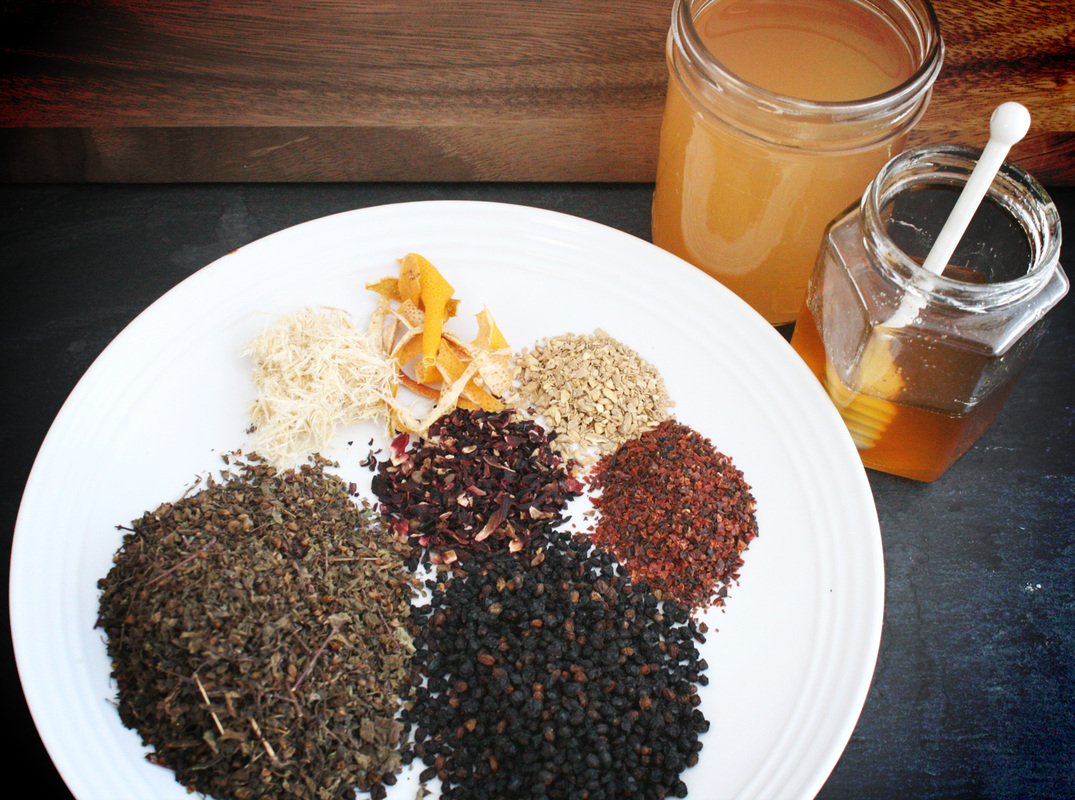 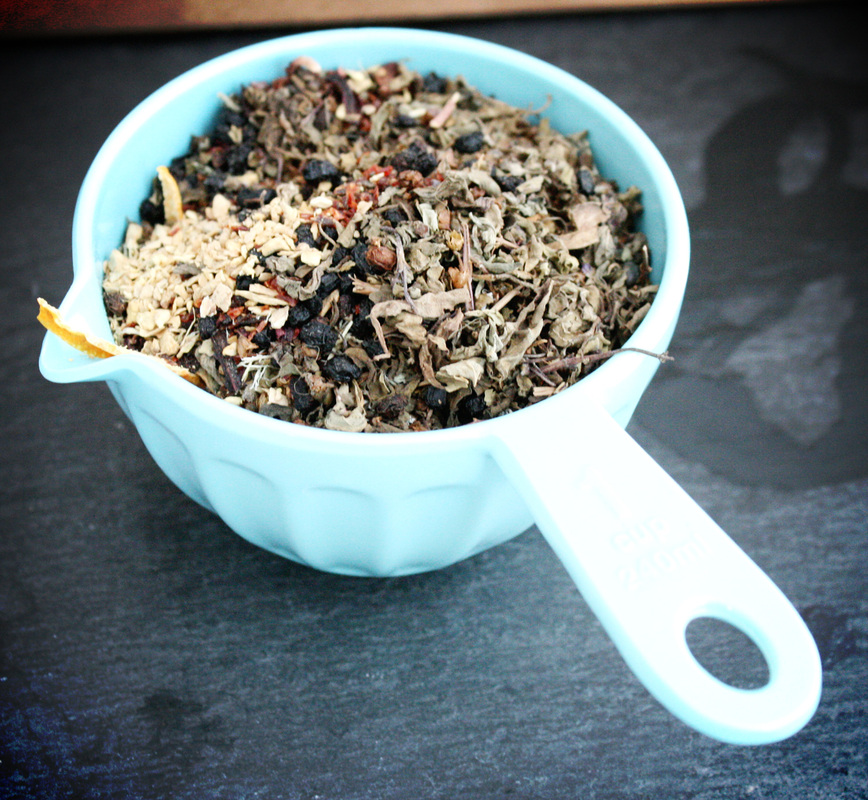 holy basil-elderberry shrubPrint | from whollyrooted.comThe ratio is basically 4:1. 4 parts honey/vinegar with 1 part herb. I measured by cup for this reason. With medicinals it is preferred to weigh not measure, but this is a beverage with some boost, so using cup measures will work just fine. {ingredients}
Add your dried herbs to a pot with 2.5 cups of vinegar. I used 2.25 cups of raw ACV (apple cider vinegar) plus .25 cups of coconut vinegar (it has a mellow sweet flavor with a lot of minerals), but you can use all ACV if you prefer. Do not use the plain white distilled vinegar you use for your cleaning or pickles. It will be gross. Champagne vinegar is an OK substitute, but ACV is your best bet. 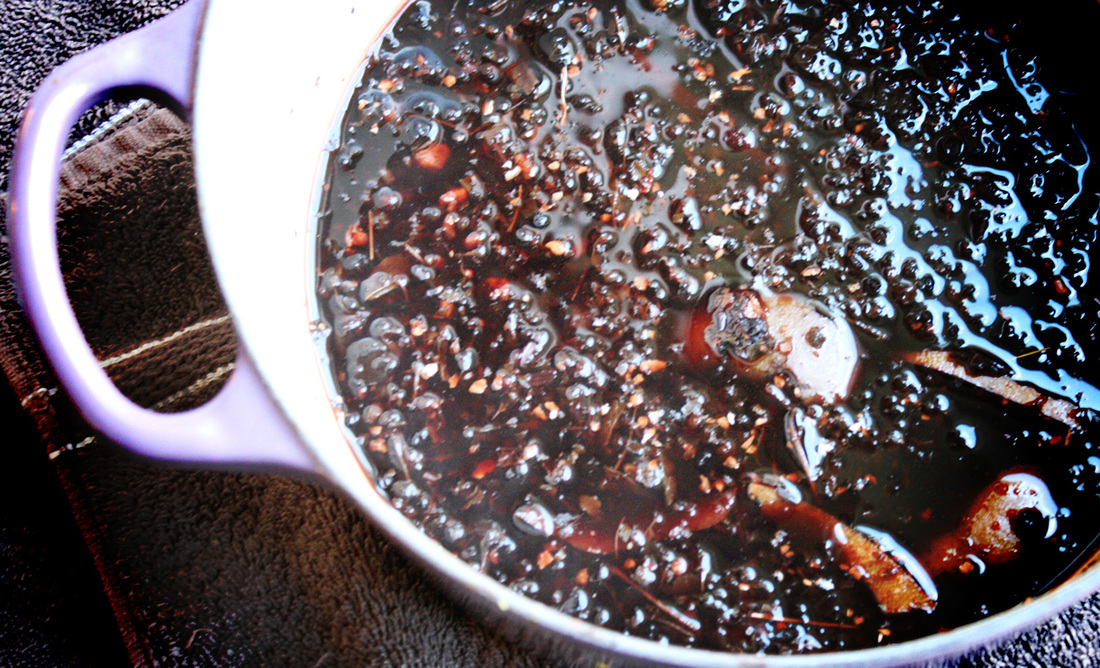  To drink, add 1/4 cup sipping vinegar to a glass, fill with sparkling water, club soda, or seltzer. Try mixing a bit into your pitcher of iced tea. Mix with sparkling wine or champagne. Or, take as a tonic by sipping a tablespoon or so in a small shot or cordial glass. For kids, the best is 1/4 cup of your shrub in a glass with ice and sparkling or soda water. 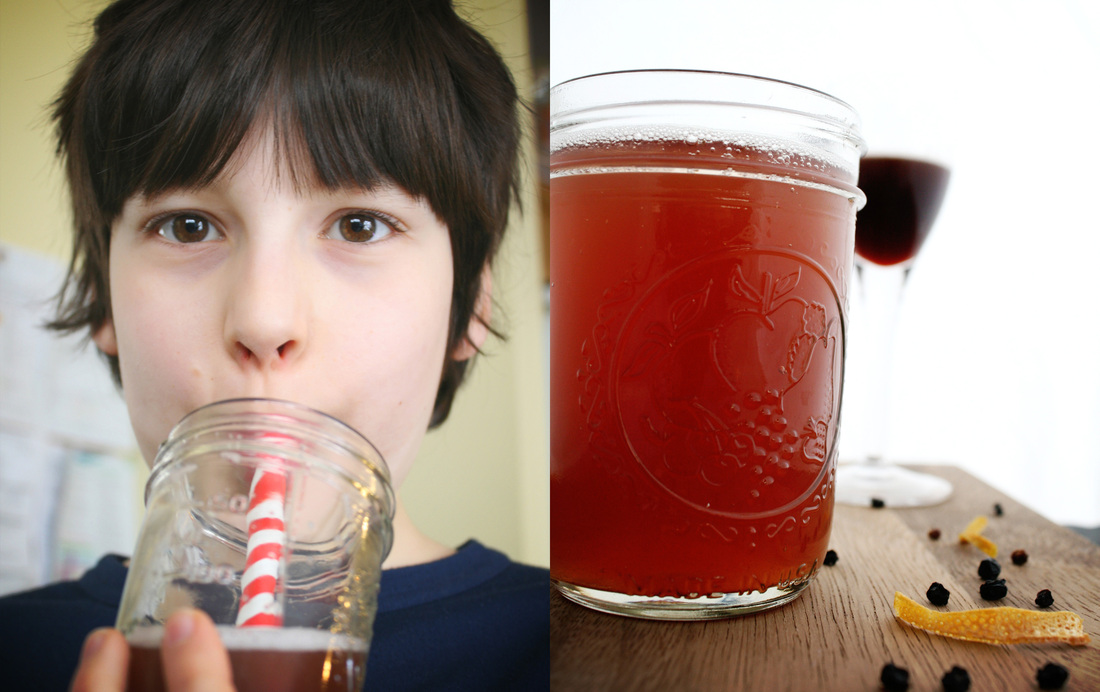 Combining the concept of alcohol free tincture or oxymels with the day to day deliciousness of a shrub means you can have a tasty refreshing fizzy soda with the benefits of the herbs! Holy Basil (ocimum sanctum) is a great adaptogenic herb that I think is underused. It has a peppery floral aroma when dried, and I think has a great flavor, especially when combined with citrus or berries. I often use it in tea blends, syrups, and vinegars. It is a nice all around herb for support.
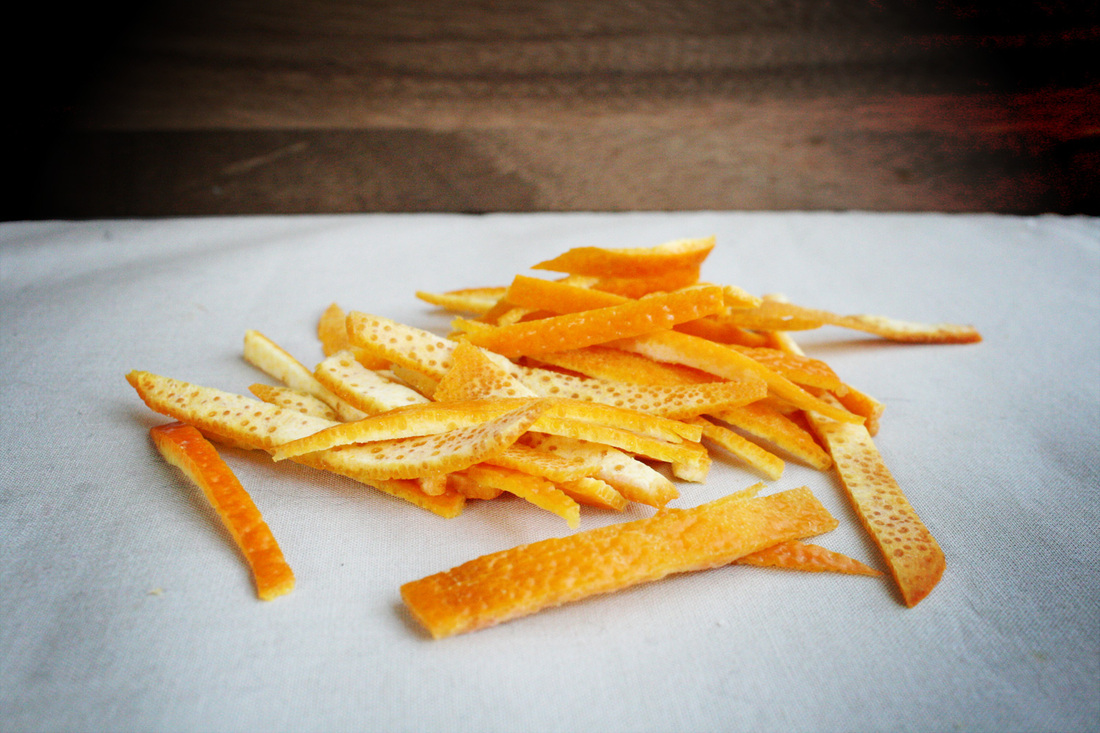
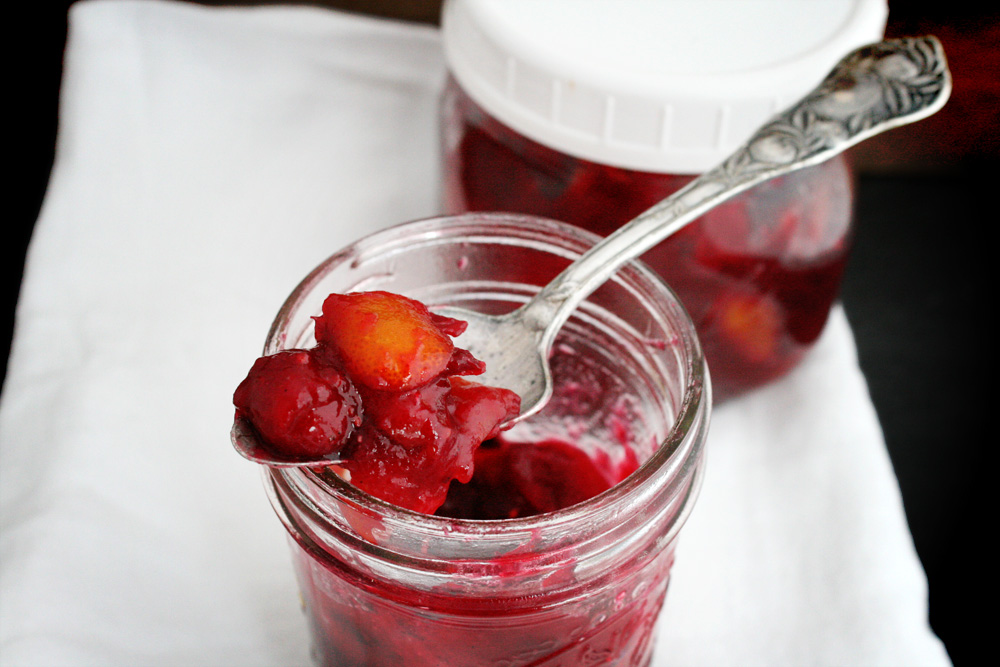 I love small batch fridge preserving. While there are many things I preserve a lot of in season, I prefer to preserve ingredients so that I can make a wide variety of flavors whenever I want. I am not a big sweet person, but I love bold unique flavors. I often make just a few pints at a time of marmalade, compote, aigre-doux, and mostarda. I like the twangy flavors to balance out the sweetness of yogurt (I love it with coconut milk yogurt) or to add flavor to things like snacks of cured meats and flax crackers. This kumquat cranberry compote is so good. It has the burst of cranberry tartness, the rich zest of citrus, with the deeper intensity of kumquat. I freeze Wisconsin cranberries in season to be used all winter if I can - but had one last bag that I had managed to keep fresh in my fridge. It goes perfectly with this short burst of kumquat season. 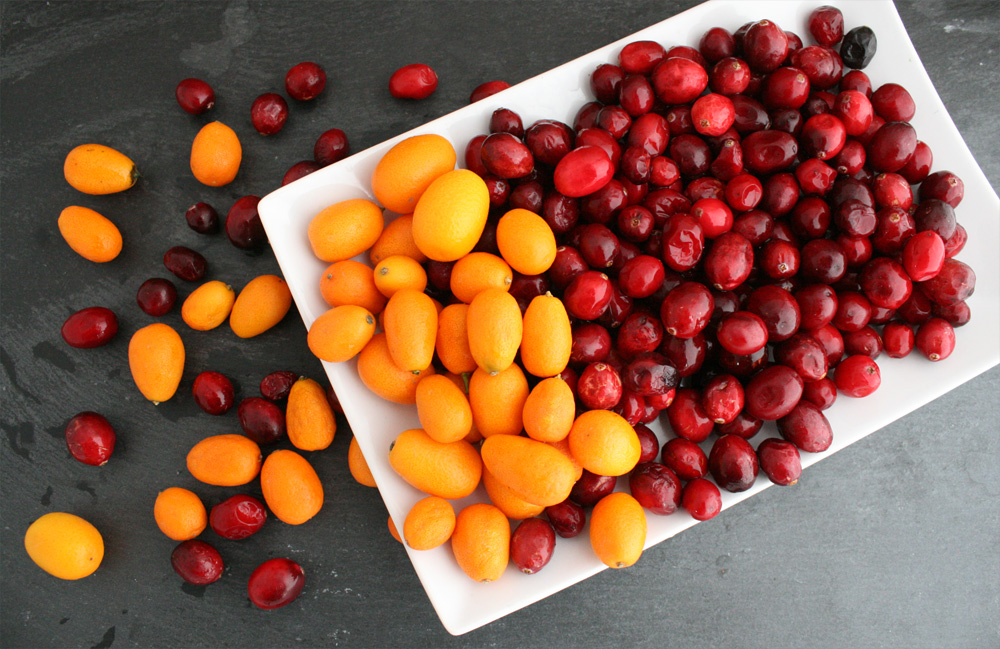 Kumquats are quirky little citrus similar in color and skin to tiny oranges, but with more of a sour pucker to them, and the fruit as well as pith and skin are edible. Kumquat are packed with anti-oxidants, vitamin C, calcium, iron, selenium, zinc, fiber, and B vitamins. And of course cranberries are full of fiber, vitamin C, antioxidants, and more as well. Having a burst of intense twangy goodness when March is long and gray is a good thing. 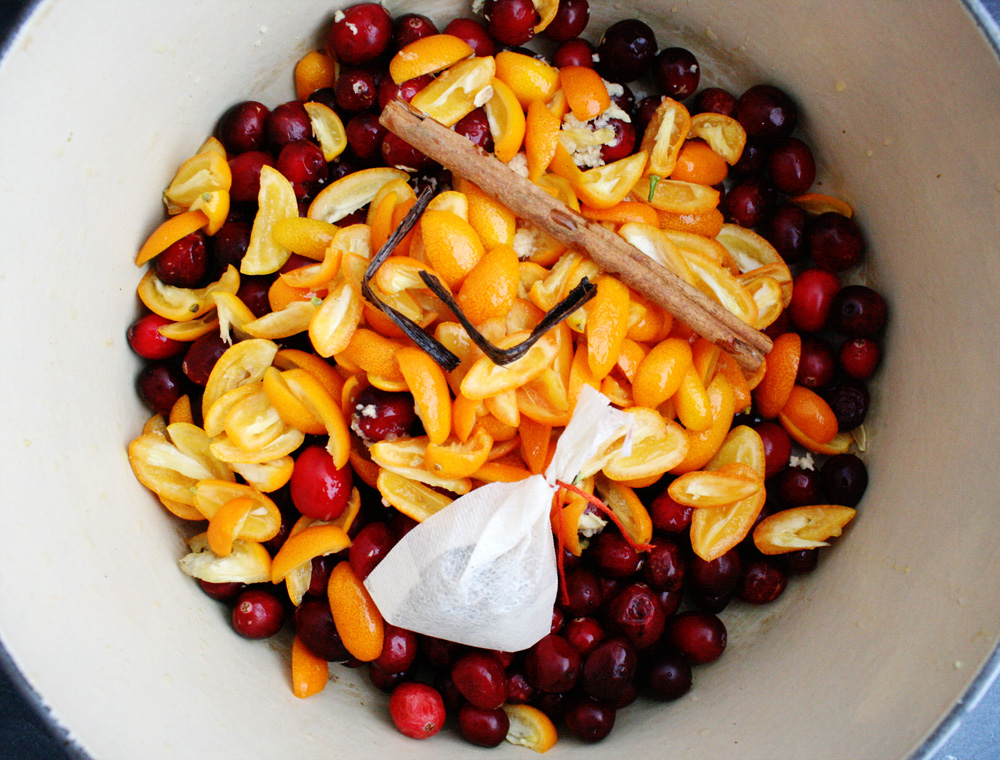 Kumquat Cranberry Compote This is a delicious twangy compote sweetened with honey. {ingredients}
Put your kumquat slices and cranberries into a big pot. Add the cinnamon stick, grated ginger, and vanilla bean to the pot. Crush the cloves, allspice, and cardamom with a mortar and pestle a bit (or put into a baggie and crack a few times with a rolling pin). Add the crushed spices to a tea bag or piece of cheesecloth. Tie it up and add to the pot. Add in your orange juice or whiskey. Start with 1/3 of a cup. Depending on how juicy your kumquats are, if your cranberries are fresh or frozen, or if you use OJ or whiskey, your liquid needs might slightly vary. Start with the smaller amount, add more as you are cooking if it is looking too dry. It should be just enough liquid to soften and integrate the ingredients into a thick but stirrable whole. With everything in the pot, bring to a boil and stir stir stir. Once boiling, reduce heat to medium and simmer for 15-20 minutes, stirring frequently, adding more liquid if necessary. If using whiskey the alcohol is cooking off, but leaving an amazing aroma and flavor. After 15-20 minutes on medium, stirring often, remove your cinnamon stick, vanilla bean, and spice bag. Add the honey, stir, and turn down to LOW for another 10-15 minutes. Turn off the heat, stir, and then let sit for a final 10 minutes or so to cool. It should be nice and thick and garnet. Spoon into clean jars, and refrigerate. This should keep in your refrigerator for a few weeks if you can keep yourself from eating all of it immediately. NOTE: If you use a very sweet orange juice as your liquid, you might not need as much honey. Taste it as you go! Make a zingy fresh dressing - mix a Tablespoon of the compote with a teaspoon of coconut vinegar and 2 teaspoons of extra virgin olive oil. Whisk until blended and drizzle over your salad or steamed veggies. It is fantastic over yogurt, on a cheese and meat plate, as a condiment with roasted chicken, in your morning hot cereal, or as a dressing for salads and vegetables.  I love the color and flavor. It has a punch of twangy cranberry, the freshest citrus zest, and enough sweetness to balance the tart without being overly sweet. It is so good!
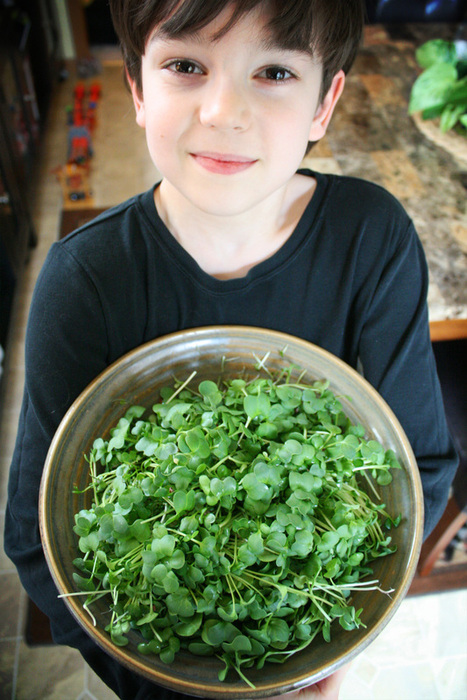
The second tray we rotate for baby greens. Peashoots, arugula, cress, head lettuce, mesclun, etc. We harvest that tray every 15-30 days or so, depending on what we are growing. So from a small two tray system in our dining room we have had fresh greens all winter. With no soil. I like it so much we are considering expanding to a larger system in our basement next winter to grow more mature culinary herbs and vegetables - although the fast seed to harvest time of microgreens and baby greens really can't be beat. 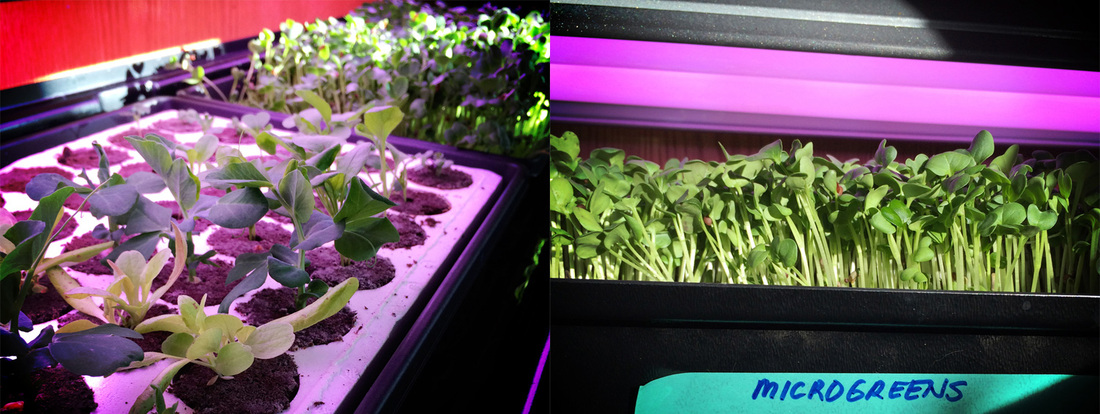
This winter we have grown everything, it seems. Mixed microgreens with radish, broccoli, cabbage, fennel, dill, mustard, fenugreek, beet, onion, kale, chard, amaranth, and more! We have harvested multiple trays of peashoots. And the baby greens! Arugula. Wrinkly crinkly cress. Dwarf pak choy. Sorrel. Shungiku. Mizuna. YUM. 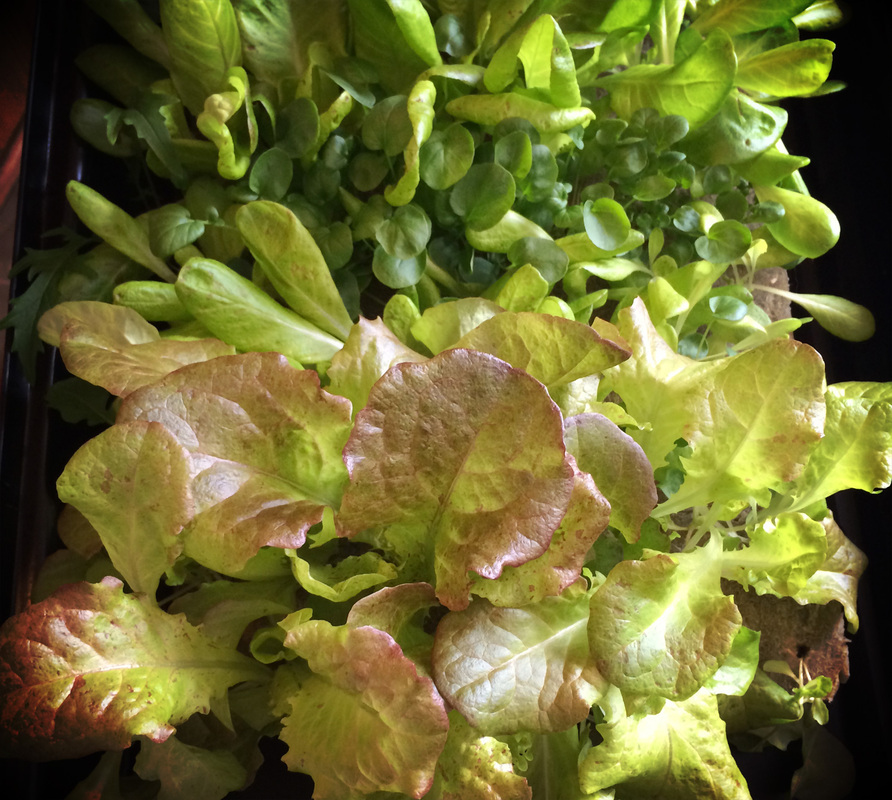
I have an excellent helper too, who loves choosing which seeds to start for microgreens, checking on our water levels and changing water, and especially cutting (his favorite part is cutting). I think both boys enjoy seeing how quickly everything grows and choosing what to grow next. 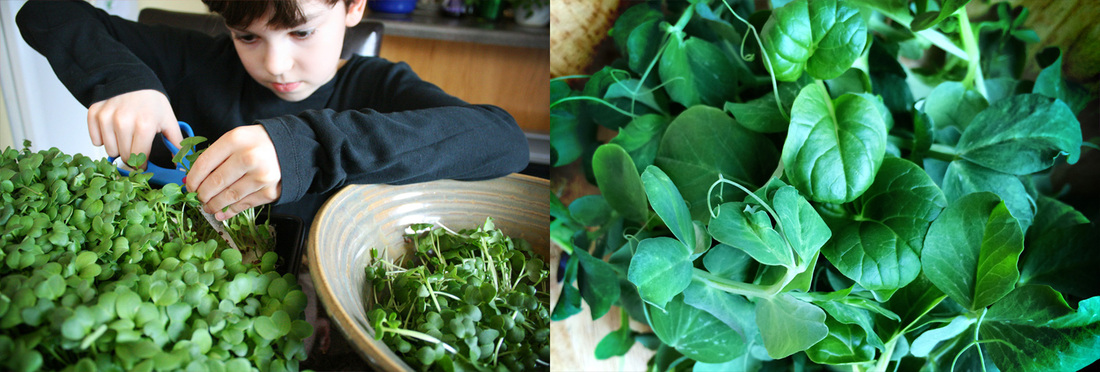
I love having fresh greens all winter. And now as hints of spring will slowly (every so slowly!) start to appear, I need the boost. I dream of salads and vegetables and herbs, but my garden won't be producing any of that for a long while still. So even though we are starting trays of seeds to plant outside, we have this more instant reward. We can see the green, we can watch the progress, we can pick and nibble whenever we like. It is so good. 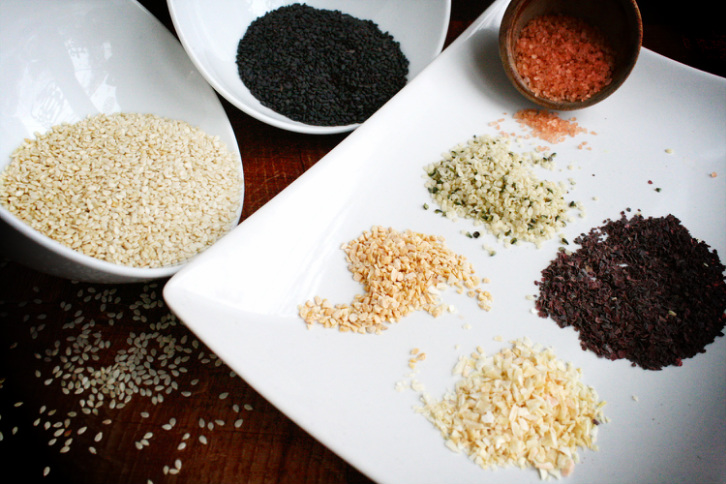 Gomasio is one of my favorite condiments made from sesame seeds and salt, often with other herbs and seaweed. It adds such a rich flavor without much salt. And for a family that doesn't eat a lot of packaged foods and uses sea salt exclusively, this also gives us iodine which is naturally found in the seaweed without any fishy flavor. It is just ... good. Every gomasio seems to have a different recipe - the variations are endless - but this is my standard go-to base recipe that I make and re-make often. I like using dulse flakes in my gomasio. Dulse is a sea vegetable which has has iron, iodine, magnesium, zinc, selenium, calcium, potassium, and a long list of other minerals. It adds so much healthy goodness without any seaweed smell. {ingredients} 1/4 cup black sesame seeds 1/4 cup white sesame seeds 1 Tbsp dulse flakes 1 Tbsp hulled hemp seeds 1 tsp dried onion 1 tsp dried garlic 1 Tbsp dried holy basil/tulsi (optional) 1 Tbsp good salt (sea salt, himalayan pink salt, alaea hawaiian salt, fleur de sel, or a smoked flake salt ... just not refined white salt) Start by toasting your sesame seeds in a dry pan on med-high. This only takes a short time - you are not cooking the seeds, just heating them to release their oils and aroma and toast lightly. Stir stir stir and remove from the heat and pour into a bowl before they start getting too dark. 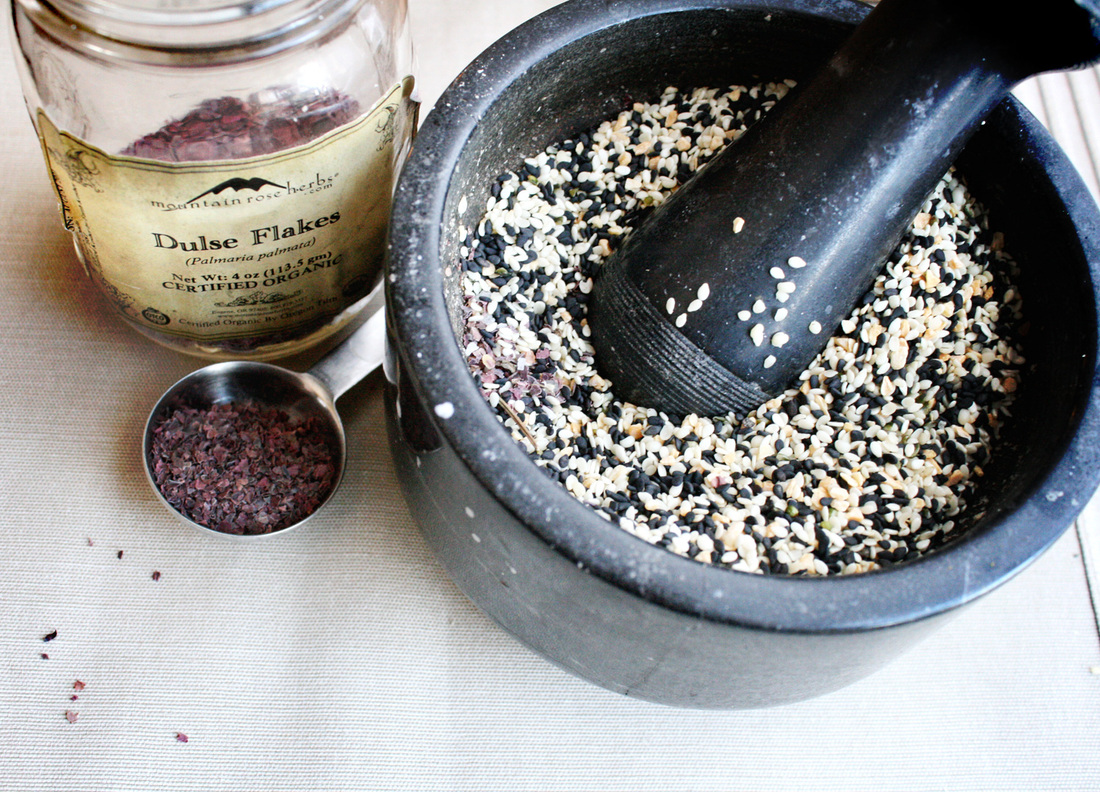 Combine all of your ingredients and gently grind together. I find a large mortar and pestle works best. You can pulse *just a few times* in your food processor, but do not over do!! You don't want to make sesame paste. You don't want a powder. You want just all of the ingredients integrated and infused with each other so they don't separate. I usually take 3-5 minutes with a mortar and pestle to gently grind it all together. Store in an air tight container - it fits perfectly in a 1/2 pint jelly jar, or put in a shaker. Sprinkle over eggs, steamed veggies, chicken, stew, soup (miso!), dips, salads, you name it. IT IS DELICIOUS!
While *more dulse* may sound like a great idea after reading about its benefits, don't. While iodine is something we all need and seaweed is common in a lot of Asian diets, it is in small amounts. Don't overdo it. This recipe has a low ratio for a reason!
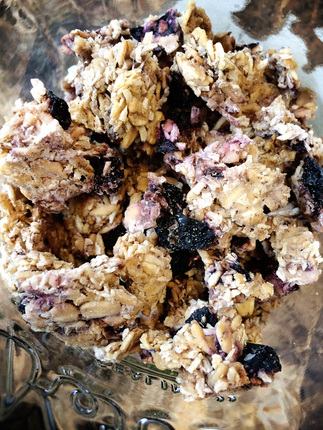
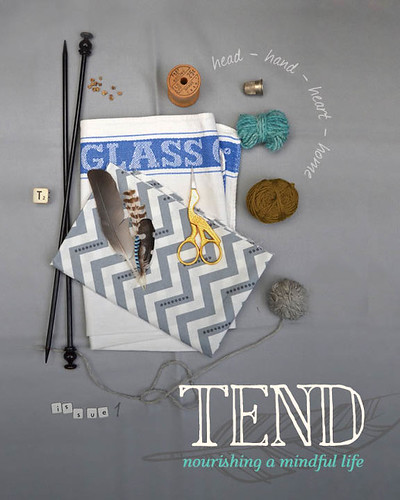 I am excited to announce a new project I have been working on which has finally launched! Almost a year ago a friend emailed me asking if I would be interested in contributing to her newest project – a magazine filled with things to do with our children, handwork, craft, gardening, homesteading, whole foods, and treading gently on this earth. Of course I said yes, and am happy to announce I am a contributing writer and Whole Foods and Herbal Health Editor for TEND Magazine, an online quarterly publication. So many talented people contributed to this premiere issue – I am proud to be a part of it! "TEND magazine aims to be at the forefront of mindful living, focusing on environmental, sustainable concerns, providing information and aspiration, driving real environmental change through change at the individual level."  "TEND magazine aims to nurture the bond between a parent and their child, between families and the earth, and between individual families to form community. It aims to strengthen the bonds and connections we have to each other and the earth, recognising and nourishing our natural dispositions to care for and educate our families in the ways that seem right to us. We aim to stir an awakening for the need to slow down, consume less and walk gently on the earth. We aim to be aspirational and utterly beautiful and design-lead. We like to grow some of our own food, support local farmers, eat as much healthy organic produce as we realistically can, gather with friends to enjoy home-cooked meals and to enjoy the bond of community. We encourage the need to consume less and make more, to envisage homesteading and sustainable living as realistic aspirations. " 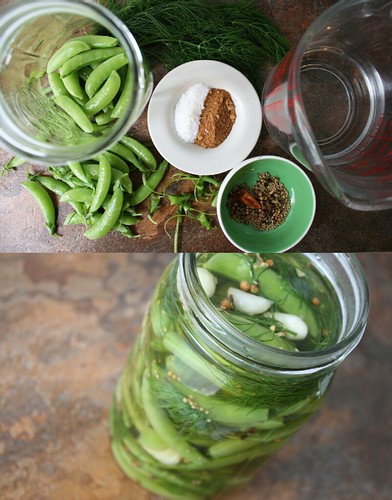 Inside this spring issue is something for everyone – ideas for the home, garden, crafting, knitting, sewing, activities and crafts for children, seeds, homesteading, whole food recipes, herbal DIY, foraging – almost 200 pages! So much goodness! The magazine website also has some lovely freebies - printable seed packets and a lovely bird drawstring bag tutorial which you can download right from the website, as well as a free bird embroidery pattern when you sign up for the newsletter!  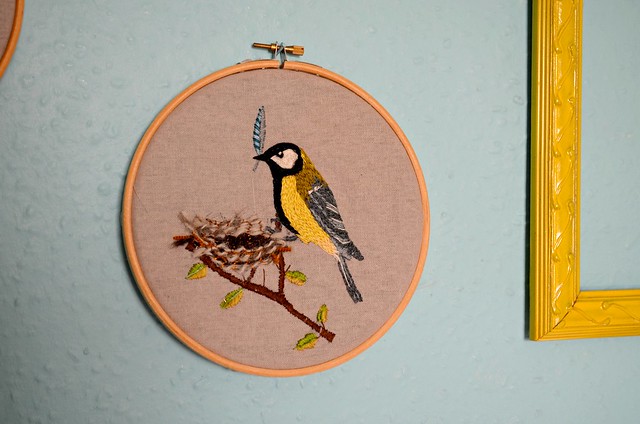 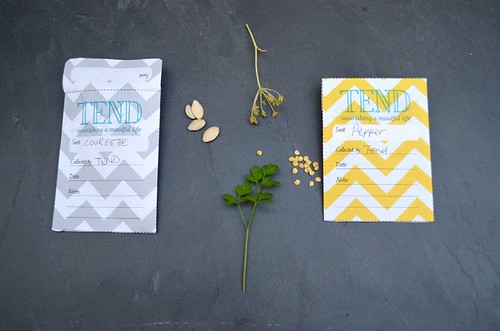 You can find TEND online at www.tendmagazine.co.uk, or visit the Facebook page (be sure to LIKE it so you can get updates! As a special bonus, leave a comment on my post here for a chance to win a free copy of the Spring issue of TEND! I will pick one winner on Friday. {closed - thanks for all of your comments!} If you don’t win, you still can receive a 20% discount on the first issue by clicking here and using the code ROOTED20 when you place your order (there is a spot to enter the code on the very last page of checkout process). Be sure to visit the other blog stops for more chances to win a free copy! 6th March Merry at Patch of Puddles 7th March Rachelle at Tales of Ted & Agnes 10th March Tif at Dottie Angel 11th March Heather at Shivaya Naturals Be sure to leave a comment! ++ March 7 - I closed the comments and have announced the winner. Don't forget - you can use the code ROOTED20 when placing your order and receive 20% off - code good through March 21. 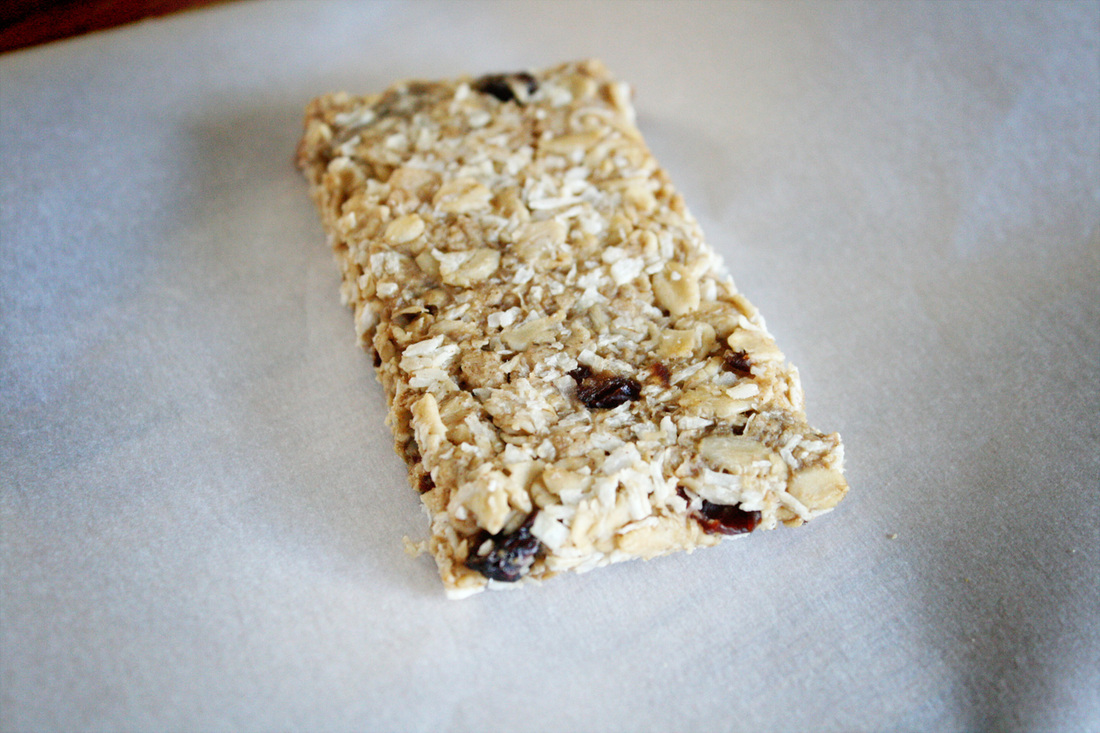 There are some staples that I try to always have on hand in the house. Flax crackers, granola or granola bars, and coconut water kefir are a few. One of the challenges of having a child with so many allergies is that often even the most simple ingredients or foods are no longer safe. Granola/granola bars is one of those things - most of the standard less expensive brands are made in facilities that also process nuts, dairy, gluten, you name it. We have found one or two trusted brands that are made in a dedicated allergen free facility, but they are not easy to find and they are expensive - not to mention flavor choices are limited. I have made this recipe as granola and/or granola bars all winter, usually about once a week. It is so good my husband eats it out of the dehydrator before it is even ready. 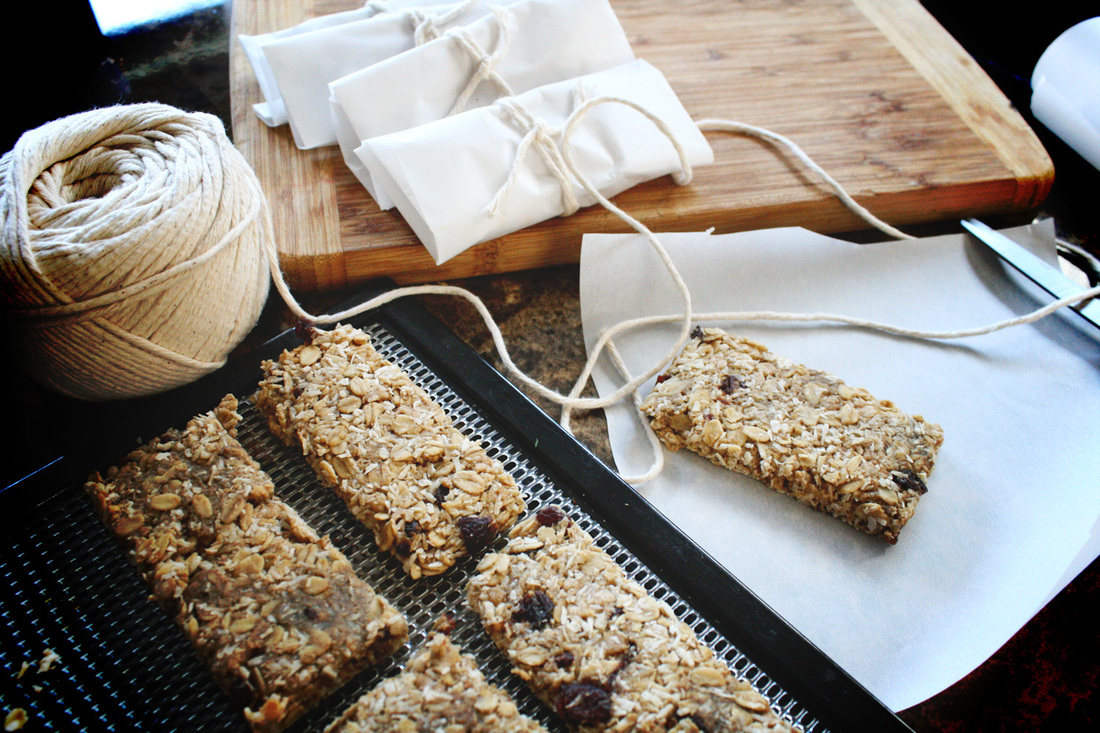 Dehydrator Granola BarsPrint | {wholly rooted}Allergy friendly dehydrator granola bars are a yummy treat for all ages. Crumble them to make granola - great over yogurt. If you don't have a dehydrator, don't worry - use your oven on the lowest setting. {ingredients}
Mix everything but the coconut milk together really well in a bowl. Make sure sunflower butter is fully blended - I have found using my fingers and rubbing it together with my fingers like making pie crust works great to get the sunflower butter fully blended. You can also just pulse a few times in your food processor - it will help the bars stay together but don't over whiz or you will miss the nice chunky bits.
The possibilities are endless. Once you start making this you won't be able to stop. Delicious! Tip: Don't forget to always read your packaging. Some brands of dried fruit and seeds are made in shared facilities with other allergens. Read the package or make your own! To make your own dried fruit, simply spread fresh fruit evenly on the dehydrator sheet. For berries like blueberries or raspberries use whole. For fruit like apples or bananas, remove peel, slice in 1/4 to 1/2" thick pieces and place on your dehydrator sheets. Dry in your dehydrator on fruit setting until full dry. Store in an airtight container until use!
|

denise cusackI am a certified aromatherapist, clinical herbalist, permaculture designer, organic gardener, plant conservationist, photographer, writer, designer, artist, nature lover, health justice activist, whole foods maker, and mother of two young adults in south central Wisconsin. 


Categories
All
©2007-23 Denise Cusack, all photos and text. Feel free to share my posts on FB or Twitter or online media or pin on Pinterest (thank you!), but please keep the links back to my website intact (meaning please do not take or copy my images off of this website and share them unattributed or without linking back here or use them without permission). Thank you! :)
|

 RSS Feed